
Thursday, November 01, 2007
Friday, October 26, 2007
Not sure about this yet...
I vowed never to get rid of the iconic 7" single lamp, but now I'm not so sure. Twin headlamps from Rich at Louigi Moto...this week anyways ;)


Friday, October 12, 2007
Dyno Chart
The idea was to get three dyno readings - one as she was when I bought her at the end of last year, a second after all the 'non engine' tuning modifications had been made, and a third when I eventually get round to the head porting and high-comp pistons. Probably also be good to get some when playing around with the TCI-P4 programmable ignition.
The green line was the stock run (apart from a set of Termi's) taken the day before she was dismantled, the red line was taken yesterday. She's now making 85.4hp and 75.2ft-lbs torque (at the crank) with MUCH smoother delivery.
The green line was the stock run (apart from a set of Termi's) taken the day before she was dismantled, the red line was taken yesterday. She's now making 85.4hp and 75.2ft-lbs torque (at the crank) with MUCH smoother delivery.
According to this, peak power is being made at 6637RPM. This is a little early compared to most graphs I've seen for these engines. As the stock carbs topped out at the same point though, I'm wondering whether this particular dyno's readings are slightly off? Might be worth getting another run on a different dyno just to make sure.

Tuesday, October 09, 2007
Stock Vs Sargent (Round 2)
Well, ‘comfier’ the Sargent seat may well be, but after a couple of rides I quickly realised I don’t like the riding position it puts you in – up high and towards the back of the bike. It feels like you’re perched up there on top, meanwhile the bike has a life of its own beneath you.
So…I went out and bought a stock seat instead. No where near as comfortable, but (for me at least) it gives a greater feeling of control. It makes me feel part of the bike.
The fat Sargent was ruinin’ my nice clean lines anyways ;) Now appearing on eBay!
So…I went out and bought a stock seat instead. No where near as comfortable, but (for me at least) it gives a greater feeling of control. It makes me feel part of the bike.
The fat Sargent was ruinin’ my nice clean lines anyways ;) Now appearing on eBay!

Sunday, October 07, 2007
Penske 8981 Rear Shock
All good things…The fiasco with the Bitubo shock not fitting properly (erm) forced me into buying the vastly superior Penske…damn ;)

Originally I was either going to have the spring replaced with a red Eibach, or have the Hyperco (that comes as standard) powder coated black however, remarkably the dark blue spring actually works really well.
Red appeared to squash the bike, with your eyes being drawn vertically down to the ground. Black would have been too dark, creating an empty hole. The dark blue however, is both dark enough to make the frame appear to float, whist offers enough light to give definition to the sculptural qualities of the spring. Eesh...what a load of complete toss!

Saturday, October 06, 2007

Hypermotard Oil Cooler
Maybe one day I’ll get around to re-locating the cooler, but for now the slimmed down, black finish of the stock cooler from the new Hypermotard is a vast improvement over the boxy original.

Crankcase Breather II
Decided just to get rid of the box but retain the hose, to give any oil that should escape at least a margin of travel. I'm still not convinced having the filter fitted directly to the breather is such a clever idea. It looks great, but I'm just not willing to risk having oil pissing all over the back wheel just for the sake of aesthetics.
Speaking of aesthetics, like a complete idiot I never thought to grind off the redundant side panel tabs from the frame before having it painted. That's going to have to wait now until the engine comes back out for the high comp pistons and head porting. Twat!


Saturday, July 28, 2007
Reservoirs
Changed all the reservoirs from Rizoma's to these ones from Goodridge. The Rizoma's looked a little too much like 35mm film canisters. Can't say I like these much either...they look like bloody urine samples.
To be honest I don't like the look of this area at all. It's a cluttered mess really. At some point I want to completely re-design the bars using minimal switch gear, something like the stuff from Pingel.

To be honest I don't like the look of this area at all. It's a cluttered mess really. At some point I want to completely re-design the bars using minimal switch gear, something like the stuff from Pingel.

Tuesday, July 03, 2007
NCR Oil Filler Cap
Sitting around waiting, staring at a bike you can't ride...just makes you do stupid things like this!


Wednesday, June 27, 2007
****ing Shocking!
Well so much for the Bitubo shock...it doesn't seem to work properly with the M900 aluminium swing arm! It does fit, but only with the swing arm at its highest position. In other words it won’t allow for any ride height adjustment beyond the hoop’s lowest setting. At 6ft 4” then, it's pretty much useless.
So…this project is now well and truly earning its keep as a ‘project’ bike. End of June and we’re still not on the road.
I’ve had to go ahead and order up a different shock. Although frustrating, it may turn out to be a blessing in disguise. I’ve ordered the Penske 8981. Although the Bitubo was a nice piece of kit, the Penske is regarded by many as being the best aftermarket shock for SS and Monster models. What’s more, LE Race Suspension are going to fit an Elbach spring…which are red :)
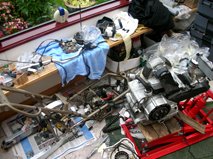
Rear Shock and Clutch Pressure Plate
- Bitubo XZE rear shock from Desmoworks
- EVR ventilated pressure plate from TPR Racing

Sargent Vs Stock
I’ve stuck a Sargent seat on there, just in case one day I decide to have kids. The stock seat is the perfect shape for moving side to side, but an absolute nightmare for shoving you into the tank. The Sargent on the other hand sits you further back, but is just a little too wide to allow you move around freely – its more like sitting on a chair than a bike.
I reckon the perfect solution will be to get the Sargent customised, and have the sides shaved down to the shape of the stock seat. Something else to do this winter.
I reckon the perfect solution will be to get the Sargent customised, and have the sides shaved down to the shape of the stock seat. Something else to do this winter.

Saturday, May 26, 2007
Lowering the Headlamp
One of the main reasons for getting rid of the instrument cluster, was to enable the visual line of the bike to flow downwards towards the front, following the curve of the tank and giving it a more aggressive look. The stock position of the headlamp looked a little too high, especially now that the gauges have gone, so we’ve lowered it by about an inch.


I’m really not sure about the stock headlamp. It’s certainly iconic, but perhaps not the look I’m after for this bike. The problem is trying to find a better looking alternative. A small bikini fairing with mini twins might be the way to go, or perhaps when it arrives one from the new style 2008 Monster, we'll see.
One thing that is being changed in the meantime however, is the finish of the rim. Chrome doesn’t feature anywhere else on this bike, so it looks a little out of place. Instead I've tried a brushed aluminium look, echoing the tips of the MIVV cans at the other end of the bike. A little better...perhaps.
Ducati Performance carbon fibre headlamp casing (Motowheels) has been painted satin black by Jacksons.
Friday, May 25, 2007
Gearing
14/40 (15/43) (Stock = 15/39)
14T Renthal front spocket (Apex Leisure)
40T Driven rear sprocket (Motowheels)
Tsubaki 520 Alpha X chain (Apex Leisure)
- RPM at 60 mph: 4078 (About perfect for this engine and bike)
- HP @ 60 mph: 41 (17% better than baseline! And, 6% better than the most conservative solution above)
- 0 to 80 mph: 4.61 (0.26 second quicker than baseline! That is huge)
- Quarter Mile Sec: 11.39 (0.20 second quicker than baseline. Very substantial improvement)
- RPM at top speed: 8293 (Fine)
- Maximum Gs: 1.05 (12% better than baseline! This is as good as a good engine mod program would get you)
- RPM at 80 MPH: 5438 (Pretty ideal for this engine)
- Crawl speed: 20 (Actually 12% better than baseline before mathematical rounding, and a solid improvement)
- HP available at different speeds in top gear: At 80 mph, you now have 53 hp versus 48, or 10% more.
- Tractive force graph: Note that we have solidly connected with the traction limit at high rpm.

Sunday, May 20, 2007
MIVV Carbon GP Low Mounts (Race Version)
These were a massive compromise to the ‘GP’ look I’m after. Unfortunately my budget just won’t allow me to build a custom set of pipes this year…hopefully next year. In the meantime, these MIVV’s (bought from PJ's Parts) were the only ‘off the shelf’ solution I could find that I felt I could put up with until that time comes.
As compromises go though, I have to say they’re not that bad…and they sound INCREDIBLE!
The headers are stock, but ceramic coated by Camcoat. I’m hoping to replace them with a set of ‘spaghetti’ headers, before replacing the whole lot with the custom design.

As compromises go though, I have to say they’re not that bad…and they sound INCREDIBLE!
The headers are stock, but ceramic coated by Camcoat. I’m hoping to replace them with a set of ‘spaghetti’ headers, before replacing the whole lot with the custom design.

Friday, May 18, 2007
Matris M3 Steering Damper
Not much to say here really...quality bit of kit that hopefully does exactly what it says on the tin.
Many thanks again to Jason at Department of Suspension for sorting out a quite frankly ridiculous price.


Monday, March 19, 2007

Tuesday, March 13, 2007
Bodywork
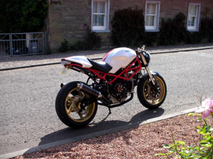
Picked up the tank and cowl this morning from Brooklands Auto Body (Dalkeith). I spent what seemed an eternity deciding on a colour scheme for this bike, eventually going with the red frame because I thought it would give some versatility when it came to changing the tank/cowl in the future.
The pearlescent white with red stripe of the new S4RS, was by no means the most original option, but arguably better than anything I managed to come up with. I absolutely love this colour scheme.
The new bikes are done using a sticker kit, but Rae (Brooklands) wanted to mask it and paint it instead. The result? I shit you not, it is simply UNBELIEVABLE!!! He already blew us away with the job he did on the frame, and now this. The guy is brilliant!
Unfortunately no picture I can take will ever do justice to that pearescent white.

Wednesday, March 07, 2007

Friday, March 02, 2007
Brakes
- Brembo fully floating cast iron discs as fitted to the top spec Ducatis from circa '88 onwards. I can see me changing these for something lighter though.
- Brembo billet "GP" calipers (pinch bolts, mount bolts, caliper pins and banjo bolts all replaced with titanium from Pro-Bolt)
- Spiegler braided lines (they did arrive, but have been sent back because they were made to the wrong size...there's another 4 weeks added already!)


- Brembo "GP" radial brake master cylinder: 19x20 from Motowheels
- Brembo "GP" billet radial clutch master cylinder from Motowheels
- Pazzo levers
- Rizoma fluid reservoirs from Motowheels...although I'll probably change these, after a mate pointed out they just look like 35mm cannisters...tosser ;)


Thursday, March 01, 2007
Speedo/Tacho
As mentioned before, we've replaced the stock clocks with something a little more subtle, a Motoscope MINI from Motogadget. It certainly won't be to everyone's taste, and to be honest I'm not entirely convinced myself yet.

I was running the 750 without clocks simply because I loved the look of the uniterupted flow of the line from the top of the tank down to the front of the bike. This was a compromise to staying legal this time.
It's not a bad wee thing actually, with the following functions: Rev Counter (LED Band); Rev Counter (Numeric); RPM Threshold/Gear Shift light; Speedometer; Trip Odometer; Total Odometer (Adjustable) and Trip Time.

The speedo works using a magnet and a sensor. The magnet is attached to one of the bolts on the rear wheel. We made a small bracket for the sensor and mounted it using the hole in the rear brake calliper hanger. The thin wire follows (and is hidden by) the rear brake line back to the cylinder, then follows (and is hidden by) the rear brake switch back into the main loom.
Forks
The stock forks have been replaced with a set of fully adjustable Showa's from a late 748. They were then sent to K-Tech to be completely overhauled and properly set. They were re-sprung and fitted with a 20mm piston kit. The long term plan is to win the lottery and fit a set of Marzocchi 43mm RAC Works forks.
- Lower triple was powder coated satin black by Aerocoat. This is just a temporary solution. Next winter it will be replaced with an aftermarket billet.
- CycleCat upper triple
- CycleCat risers/clip-ons

Speedo Drive Spacer
As we're replacing the stock cable driven speedo with a magnetic sensor from Motogadget, we can get rid of the old stock speedo drive and drive cable. The speedo drive however, also acts as a spacer on the front spindle. I guess you could just retain the old drive minus the cable, it really wouldn't look that out of place, instead though, we've decided to machine a replacement spacer.
Tuesday, February 27, 2007
Rear Sets
Another one of the biggest changes for your money...rear sets and clips-ons. We've gone back to S&P (supplied by Spareshack) again - great quality and unlike many of the other after market rear sets out there, aesthetically as simple as you like.
The long term plan is to build a custom set of exhausts, probably in MotoGP style. In the meantime though, we're going for a set of low level, carbon fibre Mivv's (supplied by PJ's Parts). These necessitate the use of the S&P hangers. We've annodised the whole lot black.
Fluid reservoir is by Rizoma, and we've replaced the manky stock brake clevis with a titanium one, both from Motowheels.


The Rear End

- Marchesini 5 spoke wheels
- Michelin Pilot Powers (120/70; 180/55)
- Driven 40T rear sprocket from Motowheels (14T Renthal Front)
- Moto Master A-505UL Ultra Light brake disk from Desmoworld
- Spiegler braided brake line
- Corsair billet chain adjusters
- Titanuim axel nuts from Motowheels
- Pro-Bolt valve caps


Electrics 2
I feel fine running without front indicators (it's going on a daylight MOT anyway), but I don't feel very comfortable with losing the ones on the rear, so in comes a CA (Clear Alternatives) integrated LED tail light.

Crankcase Breather Filter
Out goes the hideous, redundant crankase breather hose that ran from the old air box to the black plastic collector beneath the seat, and in comes a small K&N filter. We did consider striping the whole lot back to the crankcase breather, and attaching the filter directly to the breather itself, but to be honest, aesthetically it makes very little difference. Certainly not enough to warrent the risk of oil spitting out onto the rear tyre...that would not be good!

Re-Wiring the Loom
One of the first things we did with the M750 was to get rid of the cable ties from the frame. Its not difficult to do, even with the loom still in there, but starting from scratch again like this is a great opportunity to really tidy things up.
First thing is to bandage up the frame to protect it from being scratched.

The plan is run a much smaller LED speedo/tacho, so we want to try and reduce the amount of wiring clutter that normally gets hidden behind the larger stock clocks. We want take the two connectors (headlamp and starter/kill switch) that traditionally attach to the inside of the headlamp brackets and move them to behind the steering stem, attaching them to the black plastic cover that hides the regulator. The headlamp wiring will reach, but the starter/kill switch wiring will need to be cut, soldered and lengthened.
We won't be running front indicators, so these wires can be brought back and hidden beneath the tank, as can the entire warning light loom. While we were here, we re-located the horn.

The second thing we wanted to achieve with the loom, was to run it, along with the fuel lines, across the top of the cam belt casing (as oppose to in front of it, as comes standard). Again, dead easy to do when you have the lines already out of the frame. We just made some simple brackets to hold the whole lot in place, hopefully preventing it from wandering too close to the vertical cylinder.


There should be enough clearance between the lines and the heat from cylinder head, but just to be doubly sure, we decided to insulate them at the closest point. For this we used Thermal Sleeving (from Heatshield Products) capable of withstanding up to 1100 F continuous, and then holding it in place with CFT Cool Foil Tape (again from Heatshield Products), itself capable of withstanding 1000 F radiant and 450 F direct. Probably way over the top, but better safe than sorry.

Monday, February 26, 2007
Pod Filters, DynaCoils and Battery Box
We want to run pod filters again, as oppose to the open air box, so this means making another home made battery box. The one we made for the M750 was made from steel. It did the job, but was heavy and prone to corrosion. Instead, we've made this one from aluminium.
- K&N pod filters (from CA-Cycleworks)
- Dynatek DynaCoil ignition coils (from CA-Cycleworks)
- Magstar 8.5mm race wires (again from CA-Cycleworks)


Keihin 41mm FCR Carbs
In go the Keihin 41mm FCR carbs (from CA-Cycleworks). Without a shadow of a doubt the best modification I ever made to the M750.


Subscribe to:
Posts (Atom)